1.
Creating a new schedule2.
Changing an existing schedule3.
Note
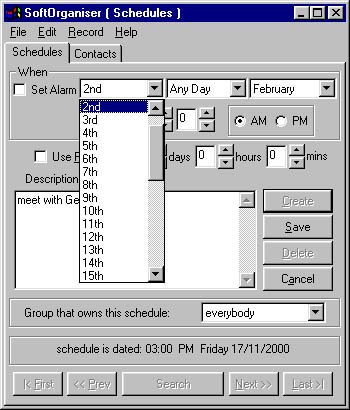
To create a new schedule, click the create button (at the top of the row of buttons on the right hand side of the SoftOrganiser window). First of all, type a description. The cursor will already be in the description field, so just start typing a description.
Click to pulldown one of the three menus. The left most menu is for choosing a date (eg 13th), the middle for choosing a dayname (eg Wednesday), and the right most of these menus is for choosing a month. The simplest way to use these is to choose, for example, (in this order) 2nd, any day, February. This would mean that your schedule would have the specific date of 2nd February (whether it occurs on a Monday, Tuesday, or whatever day of the week), and if you choose to click the "set alarm" checkbox, an alarm will go off when that date occurs.
More complicated alarms:
You can also set more complicated alarms that will go off, say, every second Monday of the month (you might need this to remind you if you were in a sports club that meets every second Monday of the month). Depending on the version of SoftOrganiser you are using, you might need to choose "2nd Instance", "Monday" and "Any Month". In later versions, you can do this with 2nd (the program "knows" you mean every month without you explicitly using "2nd instance" instead of simply choosing "2nd").|
Note: Any part of the date not specified by you will be decided by the program. The program will always decide the most appropriate year, and if you choose "any month", the program will also pick the next appropriate month for the schedule. Whenever details of the alarm are saved (whether it is first being created, or simply being changed), the program will re-calculate the next possible date and time for the schedule. |
|
|
|
|
|
|
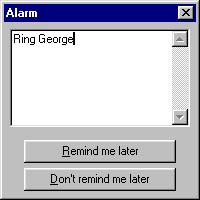
The date is also re-calculated whenever you acknowledge an alarm announcement. If you click "remind me later", the snooze time (specified in the preferences dialog) will be added to the alarm date and time, and it will go off later. If you click "Don't remind me later", the program will re-calculate the next date that alarm could go off again, rather than deleting the schedule. The main reason for this is to enable re-use of alarms… the schedule that announces your (dreaded) mother-in-law's birthday will re-calculate to next year if you click "don't remind me again". (If you click "snooze" it may go off fifteen minutes later, if that is the amount of snooze time you have specified in the preferences dialog). This is great for monthly notifications like "computer club meets every third Friday". On Friday, when you click "don't remind me later", the program will re-calculate this alarm to go off the third Friday of the next month. Note that pre-alarms can only be acknowledged (not snoozed), so that these don't affect the "real" alarm date and time. |
It is important to remember to click the "Set Alarm" checkbox (a cross will then appear in the empty box to the left of "Set Alarm") if you want an alarm to go off and warn you about this schedule.
The hours setting is fairly self-explanatory. Click on the up down arrows to change the hours and minutes part of the time of day for the schedule you are creating.
A pre-alarm can also be set to go off a number of hours, minutes or days before the "proper" alarm goes off. If you want to use a pre-alarm, make sure you click on the "Use pre-alarm" checkbox (so that a cross appears in the empty box to the left of "Use pre-alarm").
Once you've finished editing this new schedule, click "save" to save your changes.
Important: This new schedule does not actually exist until you save the details. If you cancel this operation or quit the program instead of clicking "save" to save your changes (a newly created schedule), you'll lose your changes.
Changing an existing schedule:
This is an easy thing to do. To change the schedule currently on display, simply change whatever settings or description you want to change and then click save. If you attempt to view another record before you've saved your changes, you will be asked whether you want to save the changes first. Answer yes normally… if you answer no you will lose any changes you've just made, (which is sometimes what you want to do if, for example, you've mistakenly typed something by bumping the keyboard).
Undo changes:
If ever you've made a mistake, and want to undo the changes you've just made in the description field, you can use control-z (hold down control and type a z). If you've changed times and want to undo those changes, you can either click the reset button (which is renamed to cancel when you are creating a new item).
Note: You must be viewing the schedules "panel" of the application before you can work with schedules. To bring this part of the program to the front, click on the word "Schedules" at the top of the schedules tab.

also see
creating companies